Best practices for TypeScript MPA development on .Net in 2021

There are few tips worthy to try to write better TypeScript in your .net projects as separate files. This article is using EcmaScript modules for client libraries and as well for server TypeScript dependencies.

I believe the classic Multi paged applications still have its place today and in this article I am showing how to use WebPack bundles for individual route.

The idea is to show few concepts.
– TypeScript from NPM
– Client side libraries from NPM
– ES module imports for TypeScript and SCSS/CSS
– Structure of Scripts is similar to structure of Views
– WebPack generates bundles per folders and generates them in wwwroot/ js or css folders
– WebPack generates uses source maps per bundle
– No JavaScript directry in Pages, instead just script reference Page specific generated bundle in wwwroot

The sample application is available at github:

https://github.com/martinkunc/tsbestpractices
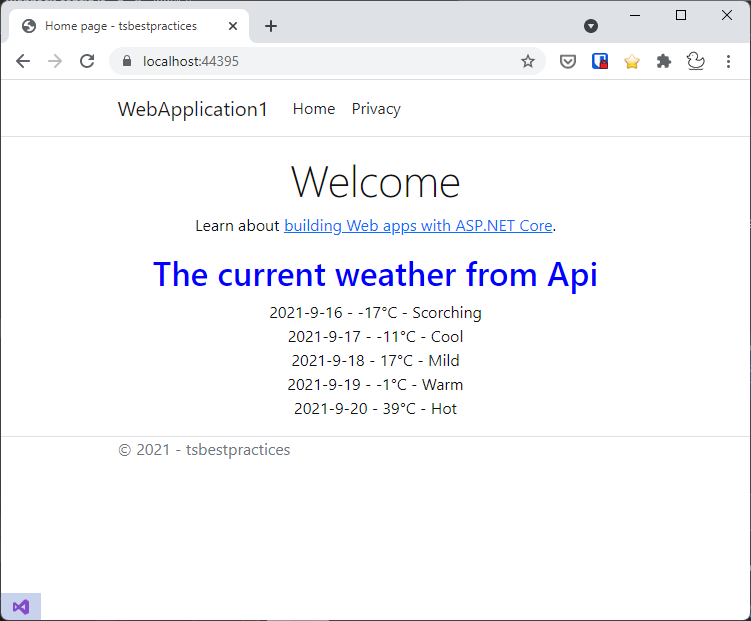
The final application.
  1. Where to place your TypeScript

Don’t place scripts inside the wwwroot, it is where the destination scripts might go, if you decide so. The source should be placed elsewhere. In .net projects most commonly it is in Scripts folder, React and Angular are using ClientApp in the web solution.

When working with css styles in WebPack, they are imported, so I am placing css in the Scripts folder as well.

2. Use npm to build TypeScript

Because we will use NPM for building and client script dependencies, we will simplify our setup and disable Visual Studio built-in compilation.

I will show how to add node check and module installation your csproj.

First, just create empty package.json inside of your web folder. To do it, execute npm init and then followed with npm install typescript. This will install typescript locally.

https://gist.github.com/martinkunc/3cbb976186184d5aa608739c9ede76f3#file-gistfile1-txt

Then add to your website .csproj following sections to block VS TypeScript, exclude node_modules and installing npm modules if they are missing on build.

Also, I am specifying Scripts as standard SpaRoot property, which React and Angular templates are using. Also, I am placing node_modules inside src/web folder (not inside Scripts). We might use it later for other web dependencies.

https://gist.github.com/martinkunc/fb3c66f9f4fcd38041e06a15c23b15b4

3. Use NPM to download client library dependencies

Most of the client libraries are migrating even client script versions into NPM packages. The system is also offering typescript typings.

I will add jquery and bootstrap libraries with npm. From src\web folder I execute:

npm i jquery bootstrap popper

and types:

npm i — save-dev @types/jquery @types/bootstrap

4. Use EcmaScript Module System

Typescript has evolved from using no module system with namespaces over NodeJs commonjs modules. Now since Ecma 2015 ES modules has become widely supported and we can use them in TypeScript as well. It only requires right configuration.

Inside your tsconfig.json use es2015 or anything newer:

“module”: “es2020”

I am using es2020 to get latest features like async/await.

Like the commonJs modules, ES modules provides modularity in your code. ES modules are getting more support in Web browsers. The Typescript transpiler will convert them still to legal JavaScript according to target specified in tsconfig.json. I am using quite conservative ES5.

“target”: “es5”,

5. Use WebPack for bundling typescript and SCSS

Usually WebPack is used together with SPA applications. It works in a way that looks for all the entries, usually *.js or *.ts files and bundles them in the .js files which are being served to the browser. For the purpose of separating bundles in our Multi Page application, I am creating a bundle per folder. In a fresh solution, we will first install webpack using npm:

https://gist.github.com/martinkunc/d8ccefb2bb4f46e090573794269221c6

Then normally we would create webpack.config.js. Lets look how section to create bundles looks like:

https://gist.github.com/martinkunc/146d6e0acd14ee1ad4b8bda19f0866bc

The entry option on line 10 is being populated by recursive traversing scripts for .ts files and creates a map in form of bundleName : pathToFile.

Because WebPack imports scss using the import statement from ts/js files, it can only search for .ts and I am importing the css from them.

To save css files separatelly in css folder. I am employing MiniCssExtractPlugin. Extracting css as a standalone file will allow us to reference styles explicitly from a Page/View where we need it.

https://gist.github.com/martinkunc/d5d4bbfa60d81bd4254972162a266c57

Also, I want to have jquery available in a global scope. It is normally not needed and the code would work without it, because webpack injects imported reference to jquery using local variable. This is just for the comfort of having jquery in global scope for javascript debugging in the browser using jquery commands. This is being done by using ProvidePlugin plugin.

The sourcemaps are also generated automatically by webpack, but because I am changing the path to /js folder under the wwwroot, and I am creating the bundle by providing full relative path, it would by defualt generate reference to sourcemap including the path. Instead I am just placing name of file, because I am in the folder already. That is the configuration for SourceMapDevToolPlugin does.

6. Use strict TypeScript settings in tsconfig.json and force single quotas by .editorconfig.

The compilerOptions from my tsconfig.json:

https://gist.github.com/martinkunc/a8ae7950c11df487e82a4fad7dd40581

and default formatting for 4 spaces as well as single quotas can be specified in the .editorconfig.

https://gist.github.com/martinkunc/4bc426ad40f87874b92d4f2510f597d4

The whole structure of solution is like this:

https://gist.github.com/martinkunc/e3822c26d8e6ecfacd761b08d67af740

Referring the client script code is being made from the particular Page, or shared component. For example in _Layout I have defined the bootstrap reference.

In the Index.cs.html is only the code related to the page. I can generate html on the server side and then link it to related typescript, which already refers exact element ids. This way I dont need any extra client script code in the views. Additionally I am using .net Core asp-append-version, instead of WebPack generated cache busting hashes. The path to generated .js file is relative to wwwroot, where everything is generated.

The file looks like:

https://gist.github.com/martinkunc/d25bc34099192396be9e510d1bd5734a

The TypeScript code for index.ts is just calling the weatcherService typescript, which is encapsulating ajax call:

https://gist.github.com/martinkunc/632b1fd1ad39afc575b3e4a51acf8ca5

Summary

The code tries to show a way how to use features of typescript in multipaged application in .net core with some good practices. I hope it makes sense, but if you have some ideas let me know.

Jednoduché zálohování do cloudu zdarma

S aplikací FBackup, která je k dispozici zdarma je nastavení zálohování na disk Google úplně jednoduché. Pokusím se popsat základní nastavení.

Budeme k tomu potřebovat stáhnout aplikaci FBackup, vytvořit Google účet a použít telefonní číslo pro ověření k novému Google účtu.

Vytvoření Google účtu

Protože budeme zálohovat na Google drive, který nabízí zdarma 17 GB prostoru, je potřeba si vytvořit Google účet, pokud ho ještě nemáte. Zároveň s online diskem dostanete Google email adresu, kterou ale nemusíte používat.

Pokud už účet máte můžete v tomto návodu přejít dolů na druhý krok, kterým je Konfigurace zálohovacího programu.

Pro vytvoření Google účtu klikněte na Přejít na Disk

Pro vytvoření Google účetu předěte na: https://www.google.com/intl/cs/drive/

A klikněte na Přejít na disk vpravo nahoře.

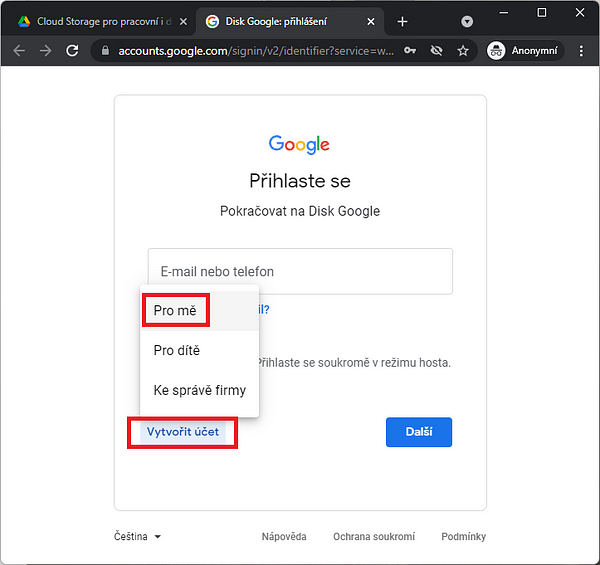
Na další obrazovce budete požádání o přihlášení nebo o vytvoření nového účtu. Klikněte na Vytvořit účet vlevo dole a následně na Pro mě.

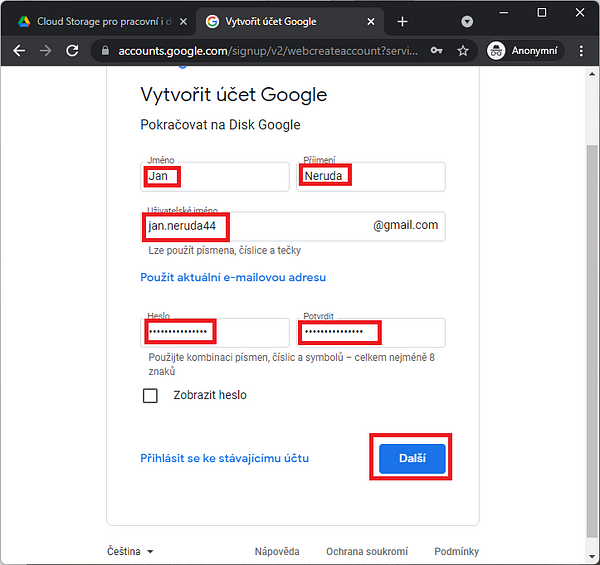
Na obrazovce kterou Vám Google nabídne zadáte své jméno a vyberete si nějakou novou emailovou adresu která už nesmí existovat v systému. V mém případě jsem na konci přidal několik číslic. Následně zadáte bezpečné heslo.

Adresu a heslo si poznamenejte.

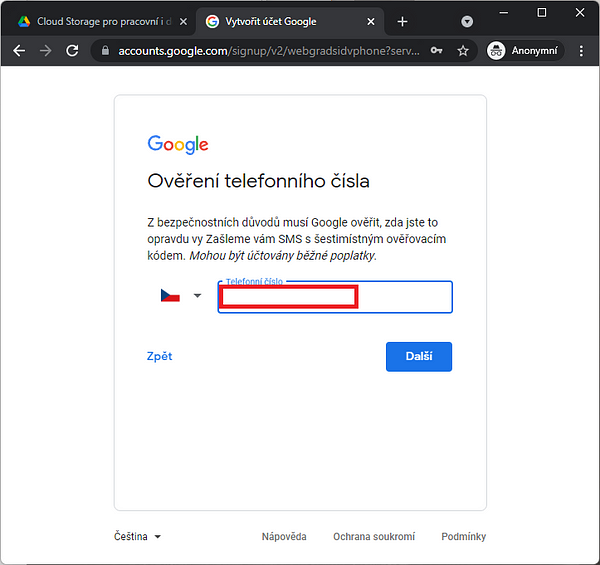
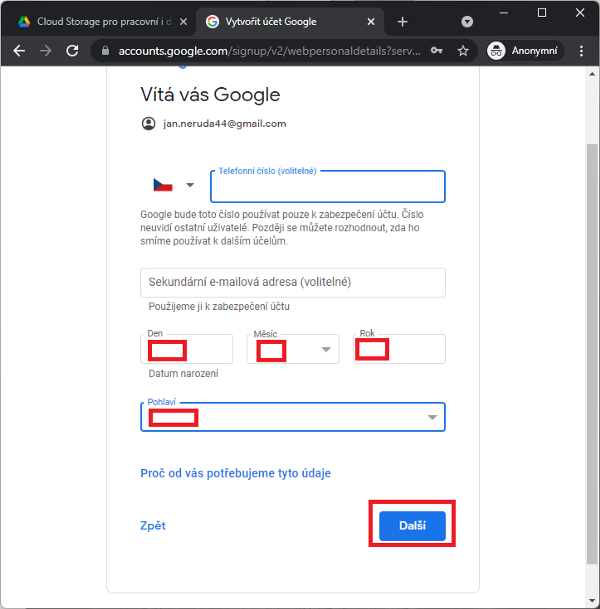
Pro ověření že jste to opravdu vy, budete muset přidat své telefonní číslo a poté kliknout na další. Systém Googlu Vám pošle zprávu, kterou budeme muset opsat v příštím kroku.

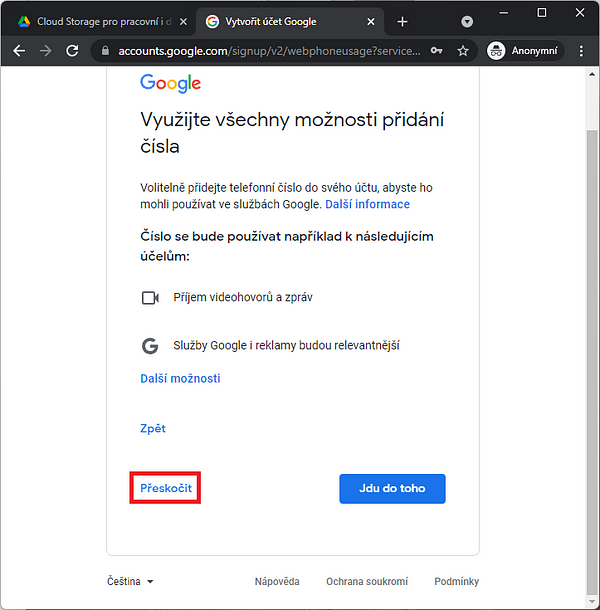
Na dalším kroku se Vás Google zeptá, jestli si může Vaše číslo zapamatovat a spojit ho s Vaším novým Google účtem. Můžete si vybrat Přeskočit, nebo Jdu do toho. Já jsem zvolil přeskočit.

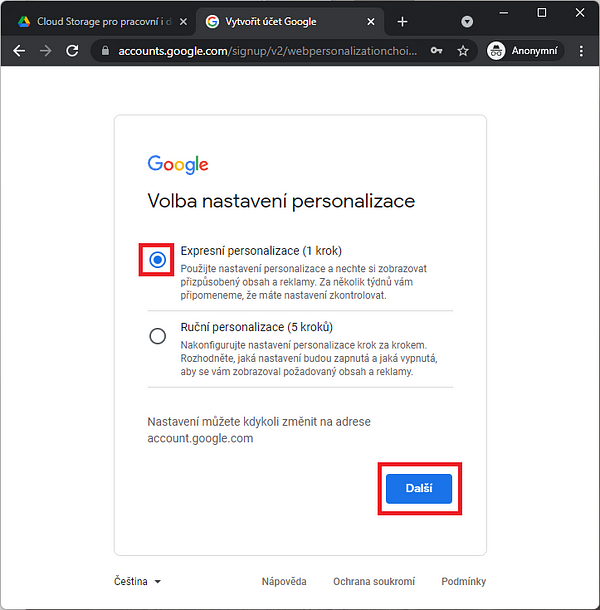
Na následujícím kroku doporučuji vybrat Expresní personalizace pro rychlé nastavení možností Google účtu.

Na dalším kroku musíte souhlasit s tím jaké údaje si Google o Vás bude uchovávat. Stránku odscrollujte dolů a vyberte Potvrdit.

A v následujícím kroku potvrdíte Google smluvní podmínky. Opět zascrollujte dolů a kliknětě na Souhlasím. To je už poslední krok konfigurace Google účtu.

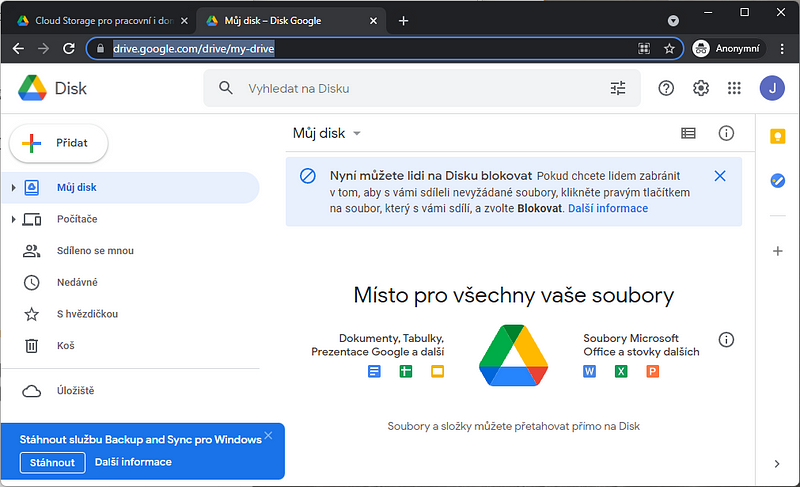
Teď jste konečně poprvé v Google účtu. Vidíte tam disk, kam se budou ukládat vaše zálohy.

Web adresa Vašeho nového disku je https://drive.google.com/drive/my-drive

Sem můžete později přijít a podívat se na soubor zálohy, no a nebo si sem něco uložit.

Instalace a konfigurace zálohovacího programu

Budeme potřebovat program FBackup. Ten lze stáhnout ze stránek https://www.fbackup.com/, kde vyberete Download FBackup (Free). Následně aplikaci spuštěním nainstalujete.

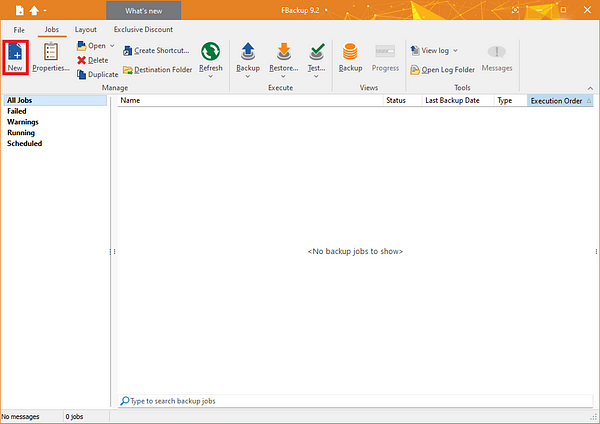
První krok k zálohování je jeho nastavení tlačítkem New vlevo nahoře.

Po spuštění začneme s vytvořením konfigurace pro zálohování kliknutím na tlačítko New vlevo nahoře.

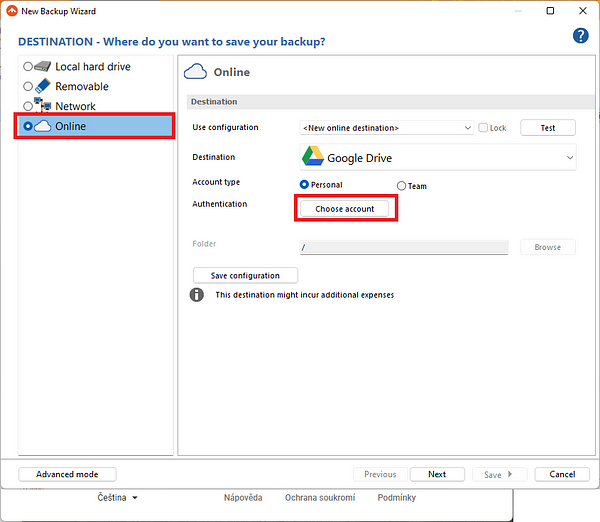
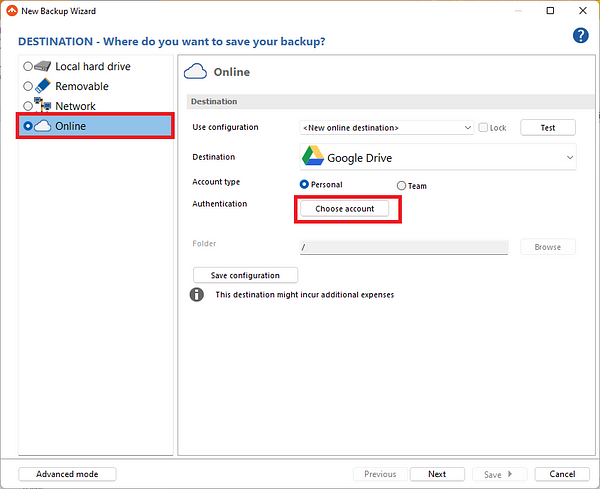
Teď si budeme nastavovat kam svoje dat uložit a v dalších krocích jaké složky ze svého počítače budeme chtít zálohovat. Protože budeme ukládat na Google disk, vybereme v prvním kroku při nastavování cíle zálohování Online.

Poté ve stejné obrazovce necháme vybrané Google Drive a Personal account, které jsou automaticky předvybrané.

V řádku Authentication klikneme na tlačítko Choose account, kde budeme vyzvání pro vyplnění našeho Google emailu a hesla.

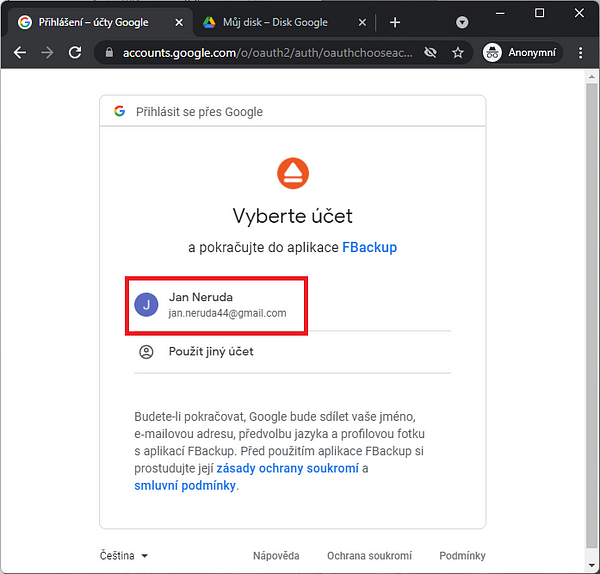
Po kliknutí se vám otevře Internetová stránka kde budete účet muset vybrat. Stačí kliknout na Vaše jméno.

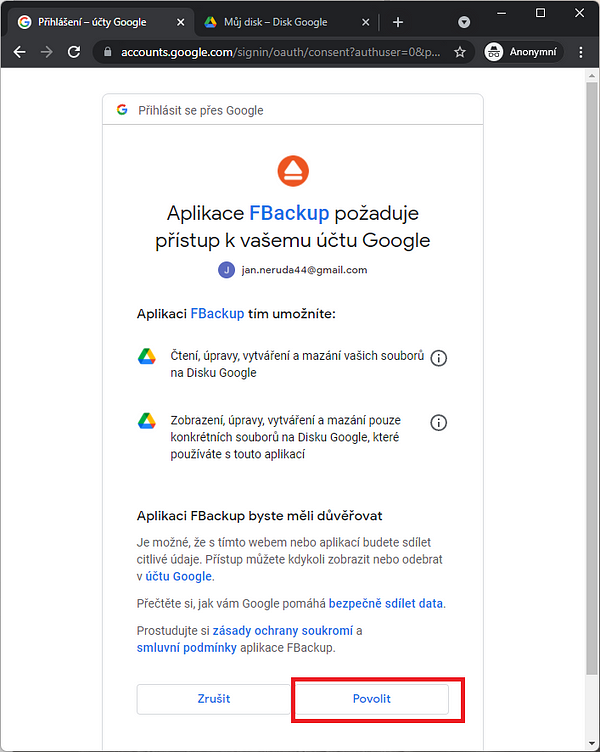
V dalším kroku udělujete aplikaci FBbackup přístup k Vašemu Google účtu který jste vybrali. Aplikace bude potřebovat nahrávat data, takže přístup potřebuje. Povolíme ho kliknutím na Povolit.

Po kliknutí by se mělo zobrazit FBackup Successfully authorized a můžete tuto stránku zavřít a vrátit se do programu FBackup.

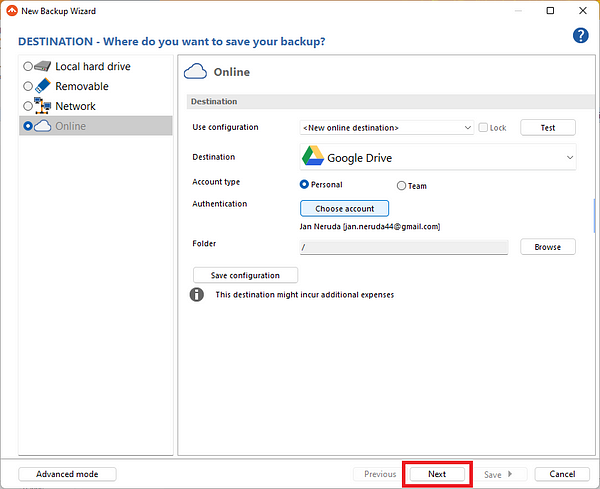
V programu FBackup byste teď po udělení práv měli vidět své jméno pod tlačítkem Authorize account. Teď budeme pokračovat na další krok kliknutím na Next.

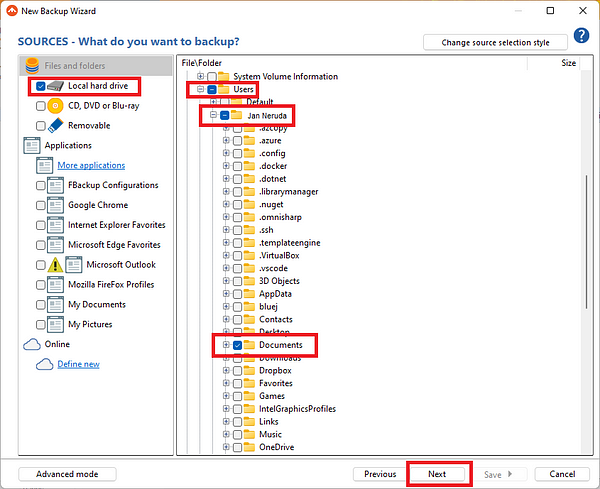
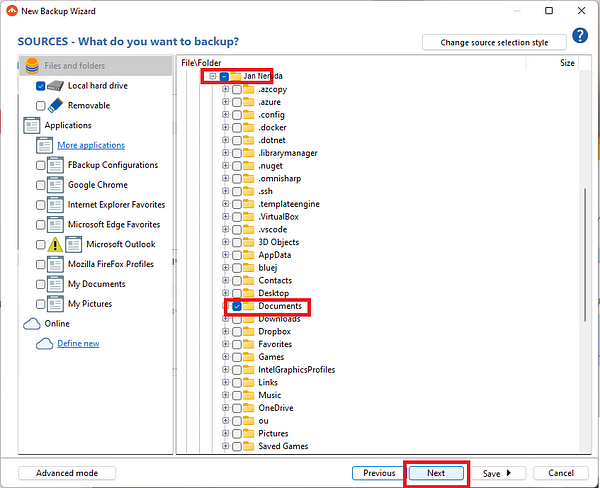
Teď programu řekneme které složky bychom chtěli zálohovat. Nevybírejte všechno, ale pokud nemáte moc dokumentů, můžete vybrat složku svých dokumentů. K ní se dostanete když vlevo vyberete Local hard drive a vpravo rozbalíte kliknutím na + pod File/Folder u disku C: následně musíte rozbalit složku Users a rozbalit svého uživatele. Např. Jan Neruda. U svého uživatele musím vybrat Dokumenty (nebo Documents) a kliknout Next pro pokračování k dalšímu kroku.

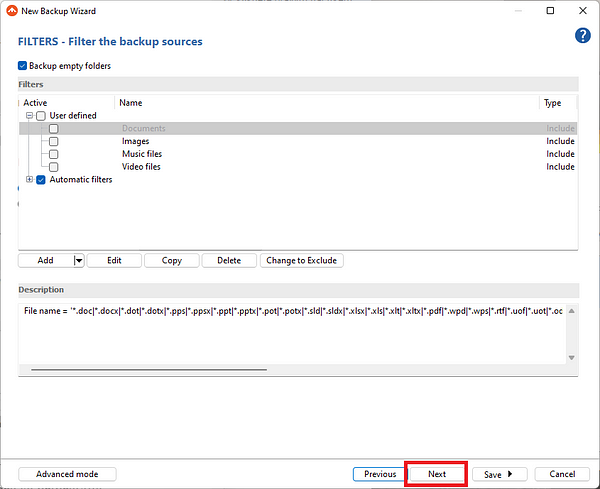
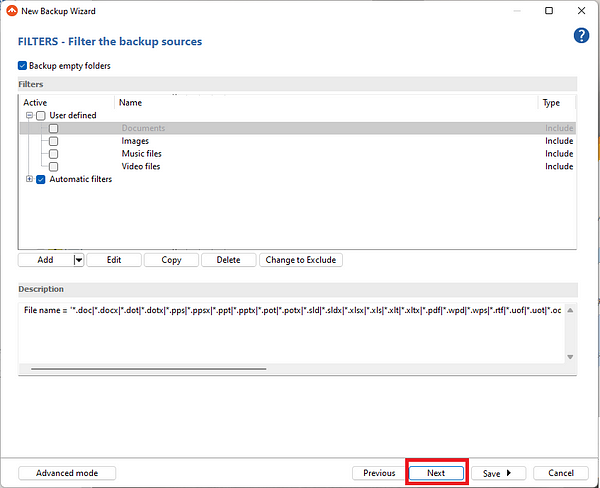
V tomto kroku je možné vybrat soubory jakého typu (s jakou příponou) se budou zálohovat, nebo které se ze zálohování Vámi vybrané složky vyloučí. To se může hodit, pokud máte ve složce Dokumetů například spustitelné .exe soubory, které zálohovat nepotřebujete. Teď zde nebudeme nic nastavovat a klikneme Next.

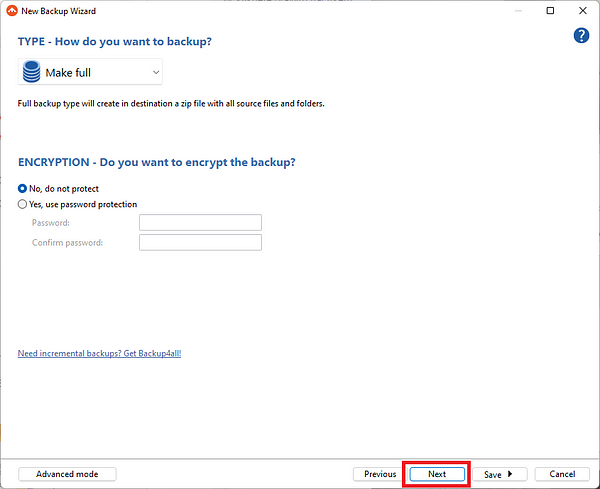
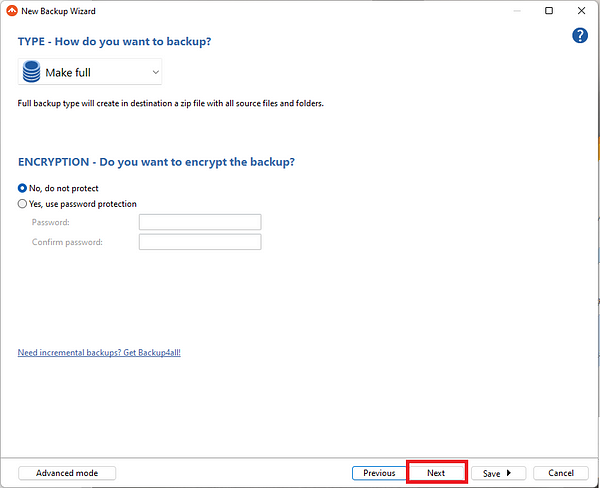
U další obrazovky volíme druh zálohy, jestli zálohovat vše a nebo jen rozdíl od posledně. Aplikace FBackup ve verzi zdarma ale umožňuje jenom plné zálohování, takže nic nebudeme měnit, necháme plnou zálohu (Make full) a klikneme na Next.

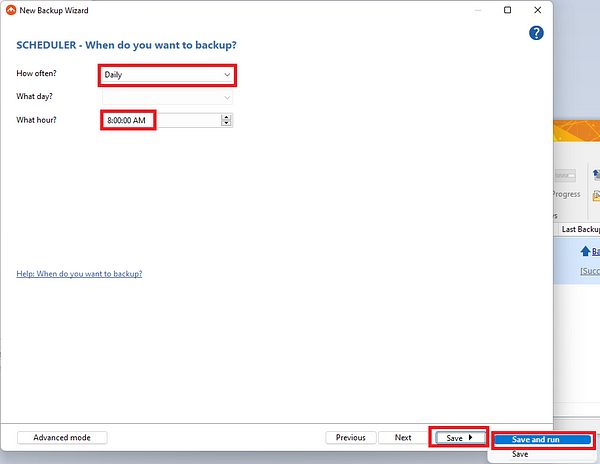
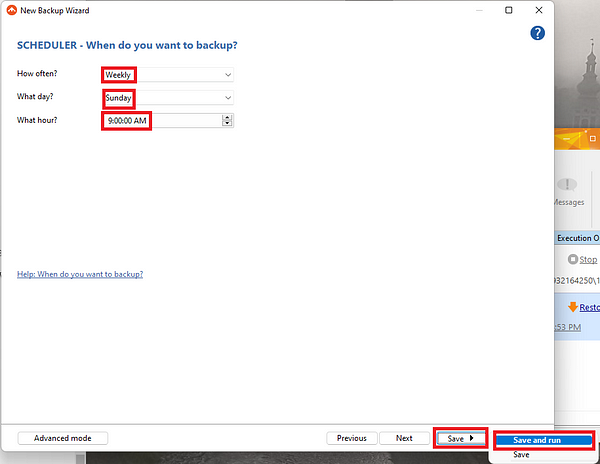
Následuje stránka plánování frekvence záloh kde se nastavuje jak často se budou data nahrávat. To je důležitý krok. Zvolíme si, že budeme zálohovat data jedenkrát denně ráno a aplikace bude na pozadí každý den vytvářet novou zálohu.

Zvolíme proto v řádku How often volbu Daily, a u času specifikujeme např. 8:00 AM. Když počítač nebude zrovna běžet, záloha se udělá v příštím možném čase.

Pro jednoduchost přeskočíme další kroky nastavení a vybereme zde možnost uložit kliknutím na Save a poté Uložit a spustit (Save and run). Tato volba zavře průvodce nastavením a spustí vytváření první zálohy.

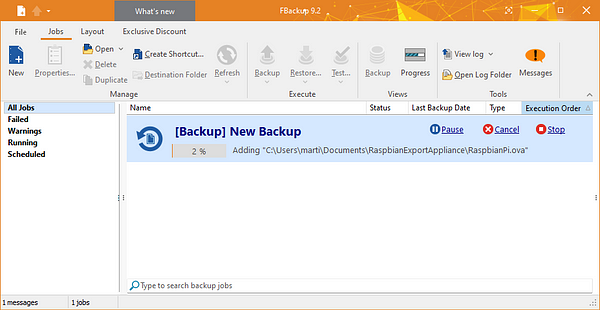
Poté už můžete v aplikaci sledovat jak se složka připravuje k zálohování v řádku New backup, kde níž vidíte procenta a soubor který se připravuje. Podle množství dat v Dokumentech které zálohujeme a rychlosti internetového připojení. V mém případě jsem měl v dokumentech 4.3 GB dat a nahrávání trvalo asi 2 hodiny, ale to je kvůli velikosti zálohované složky.

Nyní máme nastavené jednoduché jednodenní zálohování. Když bychom chtěli mít možnost obnovit starší dokumenty, které jsme smazal i třeba včera a aktuální záloha je přepsala, je dobrý nápad vytvořit si druhý zálohovací plán, který se bude přepisovat například jednou týdně.

Vytvoření týdenního zálohovacího plánu

Pro vytvoření dalšího zálohovacího plánu bude potřeba na disku Google vytvořit další složku, kam se bude tato méně častá záloha ukládat.

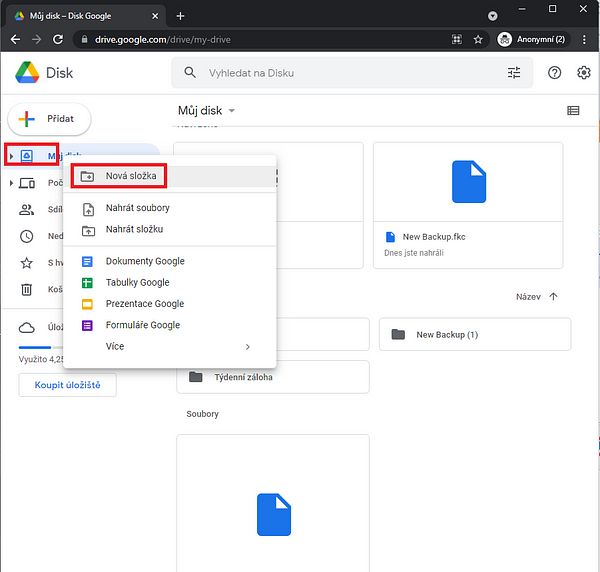
Přejdeme proto na disk Google pomocí url https://drive.google.com/drive/my-drive a na stránce Google drive klikneme pravým tlačítkem na Můj disk a vybereme Nová složka. Novou složku nazveme například Týdenní záloha.

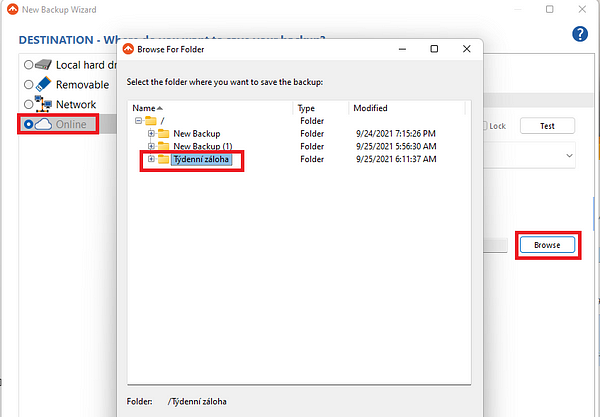
Pro nastavení dalšího plánu klikneme v základním rozhraní FBackupu opět na New, opět vybereme Online a stejně jako u denní zálohy vybereme Google účet kliknutím na Choose account. Poté na stránce nastavíme ukládání do naši nově vytvořené složky pro týdenní zálohu, klikneme na Browse a vybereme naši složku pro týdenní zálohu. U mě se jmenuje Týdenní záloha a poté pokračujeme zvolením Next.

Opět budeme nastavovat složku kterou zálohovat. Stejne jako v předchozích krocích rozbalíme disk C, Users a pod svým uživatelem zaškrtneme Dokumenty a pokračujeme kliknutím na Next.

Opět přeskočíme krok FILTERS a klikneme na Next.

Na obrazovce typu zálohování opět necháme možnost plného zálohování (Make full) a pokračujeme kliknutím na Next.

A na obrazovce kde se nastavuje frekvence zálohování zvolíme tentokrát u jak často (How often) volbu Weekly pro týdenní zálohu. Můžeme si vybrat den v týdnu a čas, já jsem vybral sobotu a 9:00 AM ráno. Protože je to poslední nastavení které jsme potřebovali udělat, můžeme ukončit nastavování a kliknout na Save a vybrat Save and run.

Nyní máme nastavený základní zálohovací plán a můžeme aplikaci FBackup zavřít. Aplikace bude běžet automaticky na pozadí a vytvářet Vaše zálohy, jak jsme ji nastavili.

Jak obnovím data ze zálohy ?

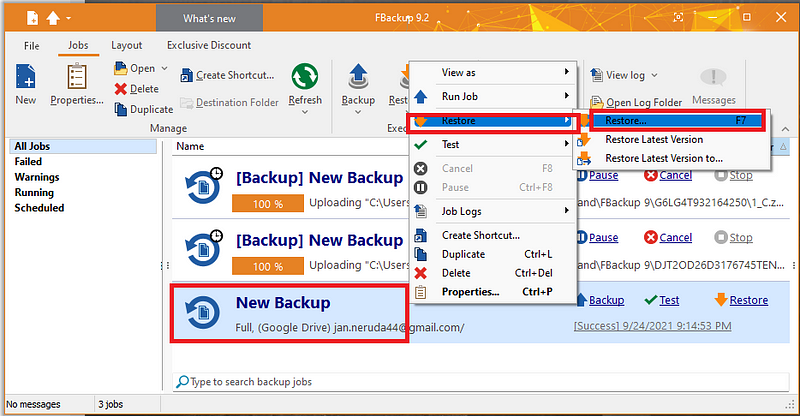
V programu FBackup si vybeme řádek s konfigurací zálohy (Buď denní nebo týdenní). Rádek ukazuje vpravo dole Success a datum a čas kdy naposledy záloha proběhla. Na řádek klikneme pravým tlačítkem a zvolíme Restore a poté Restore …

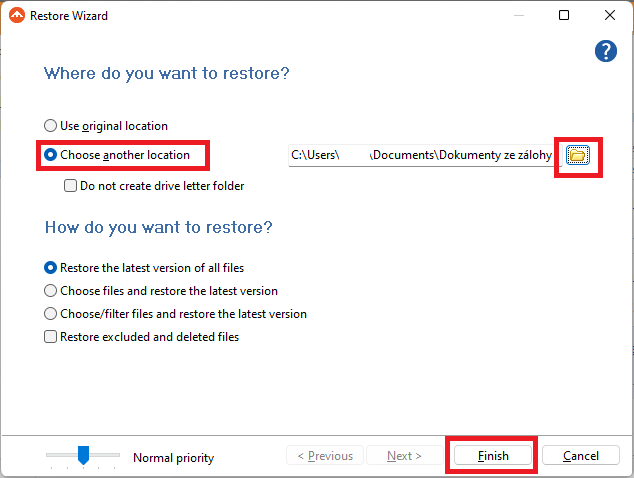
Nyní jsme dotázáni kam zálohu obnovit. Vybereme, že budeme chtít obnovit zálohu do jiného adresáře, než původní Dokumenty vybráním Choose another location a kliknutím na ikonku složky vpravo vyberu adresář. Já jsem si vytvořil ve svých Dokumentech jiný adresář Dokumenty ze zálohy. Poté jsem klikl na Finish pro zahájení operace obnovování ze zálohy.

Po dokončení operace uvidíte ve své zadané složce svá obnovená data. V mém případe s 4,3 GB dat mi obnovení trvalo něco málo přes hodinu, většina z toho času byla strávená stahováním dat z mého Google disku.

Deploy an oTree project to Heroku using otreehub.com

If you choose to deploy oTree project from your local folder, the process is following:

  1. Open cmd.exe or Terminal in a folder where your project is extracted. You should be in folder where file settings.py is. For example now I can list my otree folders using:

Screenshot 2020-05-03 at 19.14.41.png

2. If you don’t have otree installed, install it with:

python3 -m pip otree

Screenshot 2020-05-03 at 19.17.02.png

3. Create .otreezip archive using:

otree zip

Screenshot 2020-05-03 at 19.18.38.png

After this step, you should have yourproject.otreezip file in the folder (instead of yourproject will be your project’s name).

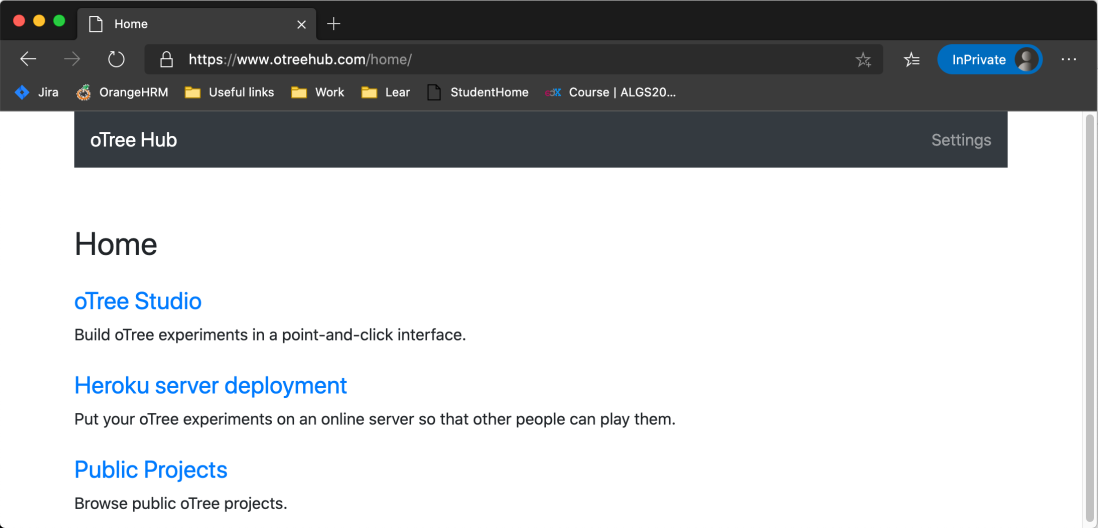
4. In your browser, go to otreehub.com, Login with otreehub account and then select Heroku server deployment:

Screenshot 2020-05-03 at 19.21.04.png

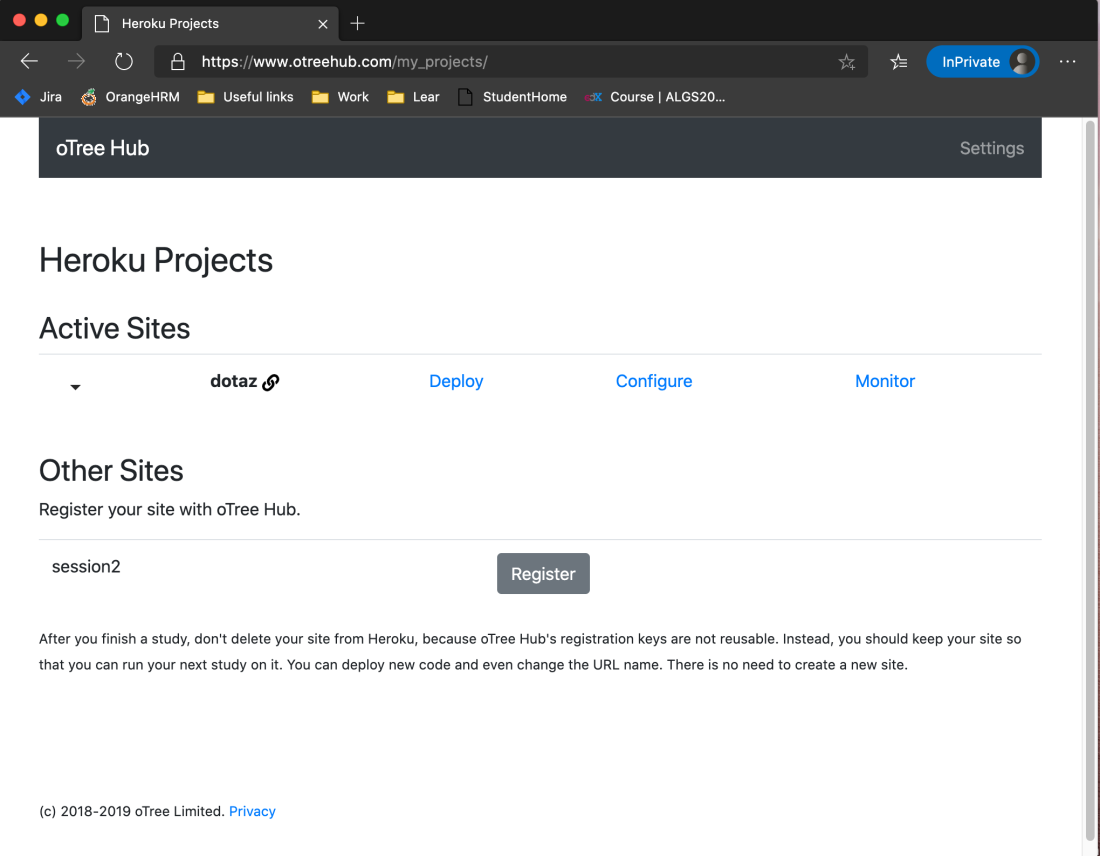
5. In the Heroku Projects In the Active Sites click to Deploy

Screenshot 2020-05-03 at 19.24.40.png

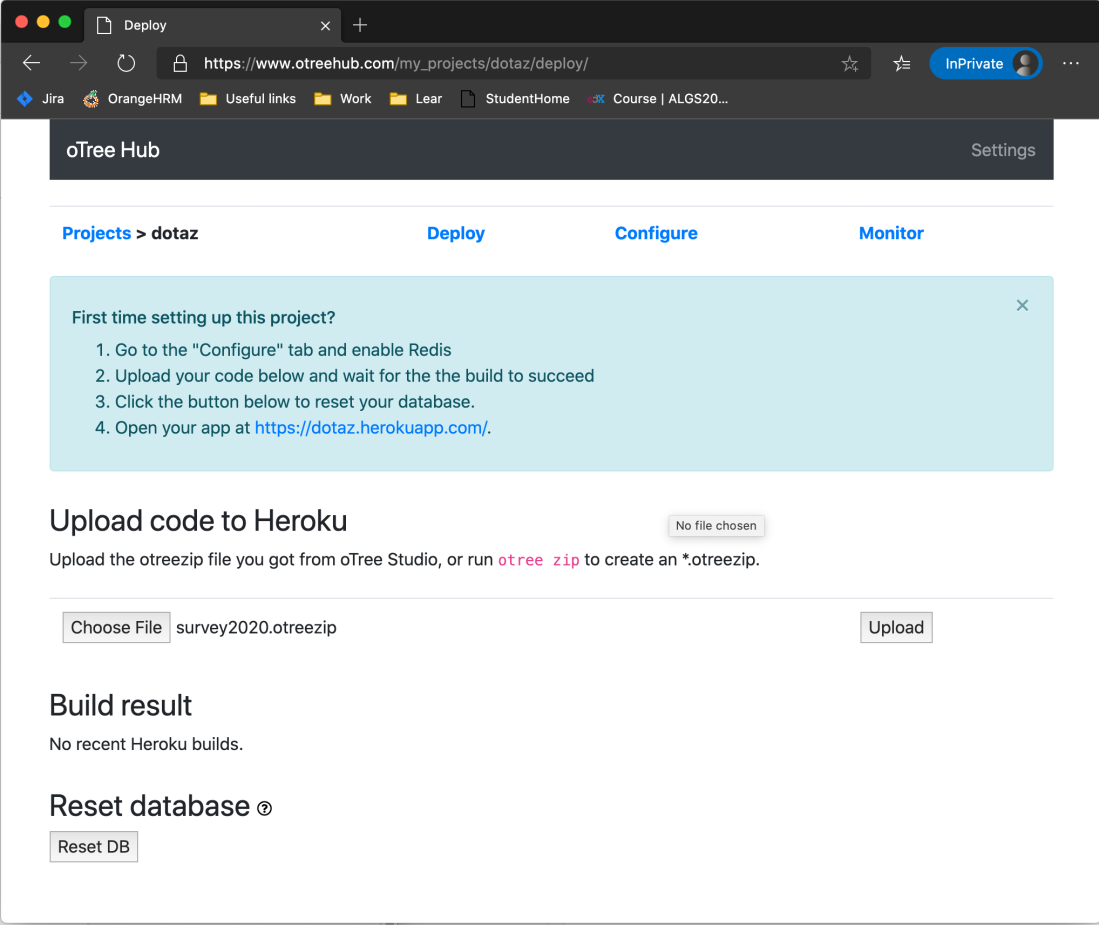
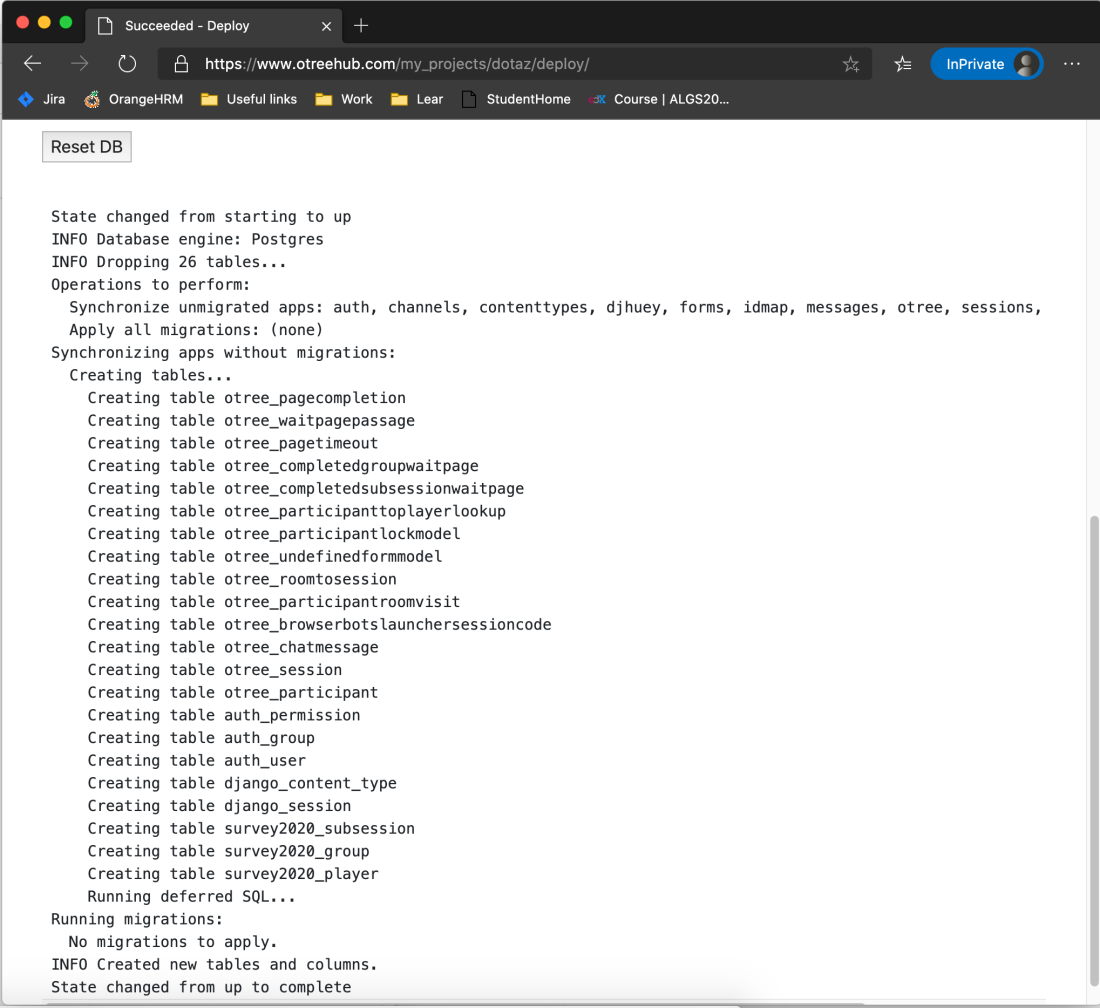
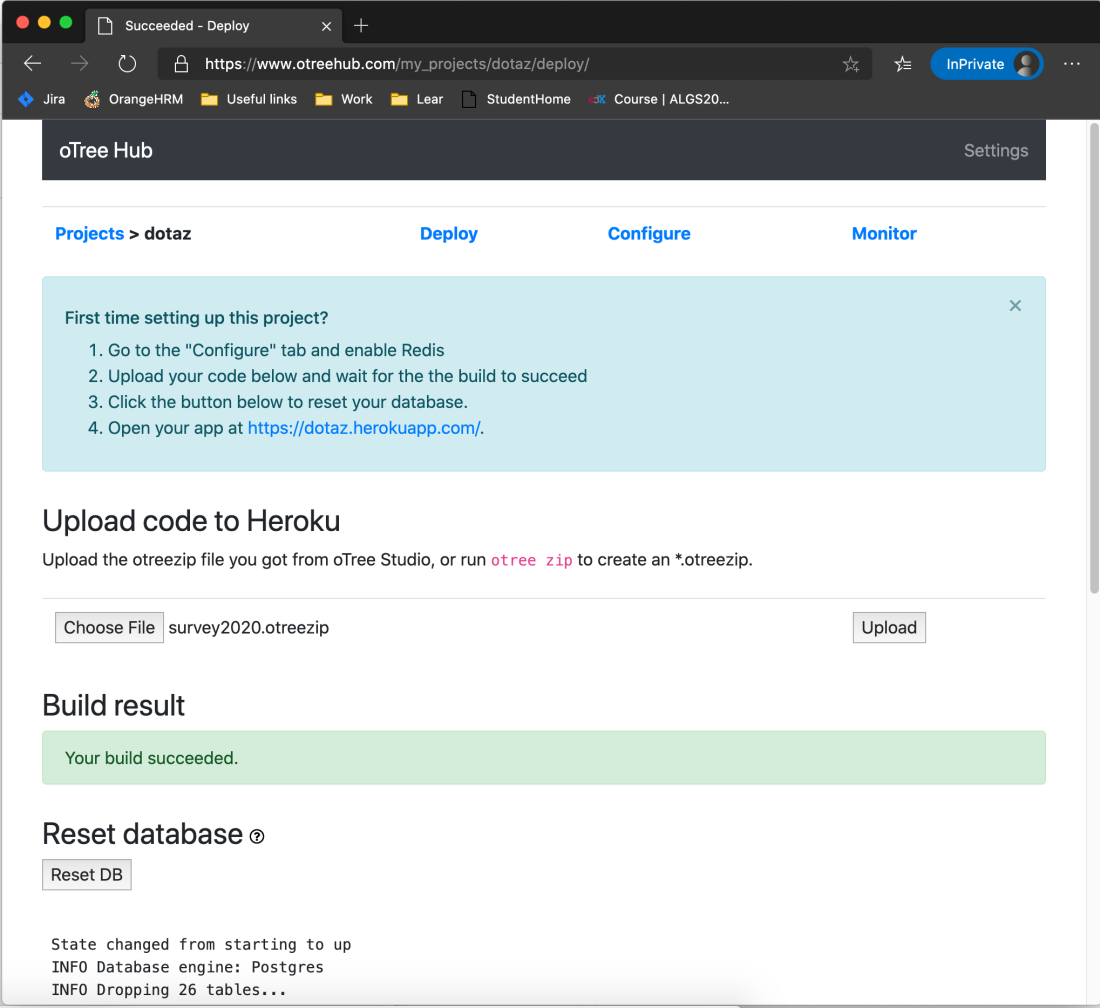
6. In the Deploy page, Click to Choose File and select the .otreezip file we generated in step 3 and click Upload. The Build will start below and shows Build Progress for few minutes. Eventually build indicator should turn green and show Your build succeeded.

Screenshot 2020-05-03 at 19.29.00.png

7. When the build finishes, the last step is to Reset the DB – this will erase stored questionary results, but its necessary when we updated the structure of site, like add a new Form field. Click to Reset DB. It would require confirmation, that you know that all will be erased. Click OK there. Then it will show the DB Deployment progress similar way like with Build above, it would have several lines.

Screenshot 2020-05-03 at 19.34.30.png

8. When you get State changed from Up to complete on last line, that is the indication that all proceeded successfully. Now we are done.

You can now open your newly deployed page. The link is displayed in the top of the Deployment page in last line of First time setting up this project? In the fourth step. Click on it to open your new Questionary on Heroku.Screenshot 2020-05-03 at 19.37.00.png

Solving module declares its path as X but was required as Y

This is quite common issue, especially when returning to some older code after some time when dependencies were refactored or moved around.

For example:

git clone git@github.com:minio/mc.git && \
cd mc && \
git checkout tags/RELEASE.2019-10-02T19-41-02Z

go build …

is failing on error:

module declares its path as: github.com/caddyserver/caddy
but was required as: github.com/mholt/caddy

The right solution is to edit go.mod and add line which rewrites the name under which it is required to fit what module declares to be, in this case:

replace github.com/mholt/caddy => github.com/caddyserver/caddy latest
The line might be highlighted by Visual Studio Code (gopls), but go build will fetch the latest version and replace it accordingly.

Nimble C++ unit tests with clang and Visual Studio Code

I only wanted this as simply as possible, so I could focus on the actual code. Without any external references.

The idea is simple:

  • Create functions which produce data for test cases
  • Call them in a loop with an Assert to verify the expected data.

The data generating test case function I was using is simple. I am passing in the reference variables, which the function will fill with test data and function is returning expected values.
In this case, input is number of pairs (3 in this case) and actual integer pairs.
The output value is possibly list of integers, in this case, just one single value, 3.

vector<long long int> prepare_case_1(int &n, vector<pair<long long int, long long int>> &segments)
{
segments.clear();
segments.push_back(pair<long long int, long long int>(1, 3));
segments.push_back(pair<long long int, long long int>(2, 5));
segments.push_back(pair<long long int, long long int>(3, 6));
n = segments.size();
return {3};
}

I am using multiple test functions. The main function Tests() will just execute each of them and assert if returned data, after calling the function under test find_points matches the provided expected values. Here it is:

void Tests() {
// The test case functions are of this type
typedef vector<long long int>
(*f_test) (int&, vector<pair<long long int, long long int>>&);
map<string, f_test> tests = {
{ "prepare_case_1", prepare_case_1 },
{ "prepare_case_2", prepare_case_2 },
{ "prepare_case_3", prepare_case_3 },
{ "prepare_case_4", prepare_case_4 },
{ "prepare_case_5", prepare_case_5},
{ "prepare_case_6", prepare_case_6}
};
for(auto const& t : tests) {
int n;
vector<pair<long long int, long long int>> segments;
  // Let the Test Case function fill in the case data
auto exp = t.second(n, segments);
  // Call the method under test with provided data and collect
// the actual result
vector<long long int> act = find_points(segments);
  M_Assert(matches(exp, act), 
(string("Test ") + t.first + string(" ") +
to_str(exp) +
string(" doesnt match ") +
to_str(act)).c_str());
}
}

Thats it.
The function starts with creating list of test-case functions, prepare_case_1, … to prepare_case_6. They form a map with the name of each one for easier identification when they fail later.
Then, t.second() will call the actual individual function pointer to let it fill the n and segments (both are passed by reference).
The main Act of the test calls some method which I am testing here, which takes segments (with the test data) and returns vector of ints.
Assert phase of test is actually interestring. I didn’t like pure assert function, and I quite like solution with a custom macro, provided on Stackoverflow from Eugene Magdalits. The idea there is not just assert expression, but also show actual values and test case when it fails.

The M_Assert function, which I am using:

#ifndef NDEBUG
# define M_Assert(Expr, Msg) \
__M_Assert(#Expr, Expr, __FILE__, __LINE__, Msg)
#else
# define M_Assert(Expr, Msg) ;
#endif
void __M_Assert(const char* expr_str, bool expr, const char* file,
int line, const char* msg)
{
if (!expr)
{
std::cerr << "Assert failed:\t" << msg << "\n"
<< "Expected:\t" << expr_str << "\n"
<< "Source:\t\t" << file << ", line " << line << "\n";
abort();
}
}

At this point, it would be possible to call method Tests() from your main. But I wanted to have separate entry point for Tests, so I wouldnt need to change main for running tests.

Running specific C++ entry point in Visual Studio code

For this, we will specify -e parameter to clang++ with name of entrypoint function.

We will add a new function to our code. The extern is here because C++ function symbols otherwise have mungled names. A C function will just have underscore before it. We will see the call later.

extern "C" int test(int argc, const char **argv)
{
printf("Tests\n");
Tests();
}

Now, we could compile our source with
clang++ -std=c++17 -stdlib=libc++ -g file.cpp -e _test

But we can have nice debug experience in Vs Code.

In the Visual Studio Code, change the .vscode/launch.json and add there a new Configuration section Tests, like in following:

{
"version": "0.2.0",
"configurations": [
{
"name": "Debug",
"targetArchitecture": "x86_64",
"type": "lldb",
"request": "launch",
"program": "${fileDirname}/${fileBasenameNoExtension}",
"args": [],
"stopAtEntry": true,
"cwd": "${workspaceFolder}",
"environment": [],
"externalConsole": false,
"MIMode": "lldb",
"preLaunchTask": "clang++ build active file"
},
{
"name": "Tests",
"targetArchitecture": "x86_64",
"type": "lldb",
"request": "launch",
"program": "${fileDirname}/${fileBasenameNoExtension}",
"args": [],
"stopAtEntry": true,
"cwd": "${workspaceFolder}",
"environment": [],
"externalConsole": false,
"MIMode": "lldb",
"preLaunchTask": "clang++ build active file for test"
}
]
}

This new configuration Tests will just run current file, but before, it will compile it with prelaunchtask “clang++ build active file for test”. We should specify it in .vscode/tasks.json:

{
"tasks": [
{
"type": "shell",
"label": "clang++ build active file",
"command": "/usr/bin/clang++",
"args": [
"-std=c++17",
"-stdlib=libc++",
"-g",
"${file}",
"-o",
"${fileDirname}/${fileBasenameNoExtension}",
"--debug"
],
"options": {
"cwd": "/usr/bin"
},
"group": {
"kind": "build",
"isDefault": true
}
},
{
"type": "shell",
"label": "clang++ build active file for test",
"command": "/usr/bin/clang++",
"args": [
"-std=c++17",
"-stdlib=libc++",
"-g",
"${file}",
"-o",
"${fileDirname}/${fileBasenameNoExtension}",
"--debug",
"-e",
"_test"
],
"options": {
"cwd": "/usr/bin"
},
"group": {
"kind": "build",
"isDefault": true
}
}
],
"version": "2.0.0"
}

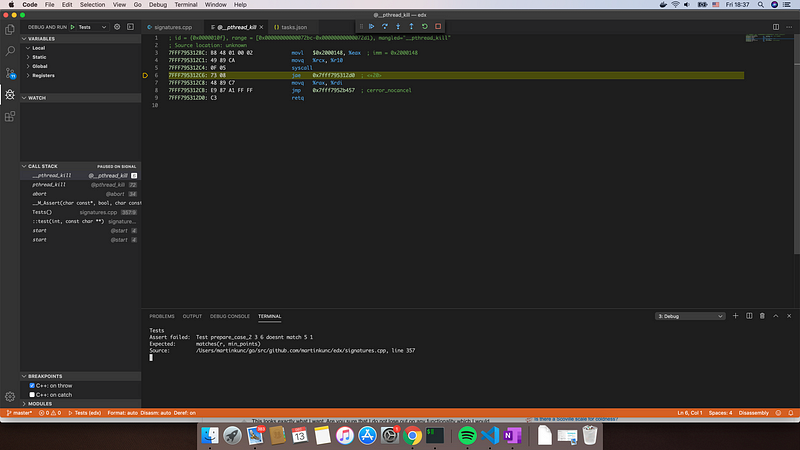
In the Left Debug and Run pane, we switch to our Tests configuration and hit F5. It would start compilation with custom test entrypoint and start Tests. In this case, this is how it looks when tests fails.

C++ compilation and debugging in Visual Studio Code

I found few small knots during the setup of Visual Studio Code with Clang++ on Mac, which I wanted to describe here.

What we will need
– Visual Studio Code
– Installed clang++ compiler
C/C++ for Visual Studio Code — extension by Microsoft
CodeLLDB
– Setting files in cpp project

Debugging on MacOs Sierra

It seems that standard debugging in C/C++ extension alone doesn’t work, due to issue 3829. As a workaround, someone in the case mentioned use excellent CodeLLDB debugger extension.

Now we will be editing three Visual Studio Code setting files:

.vscode/launch.json
.vscode/tasks.json
.vscode/c_cpp_properties.json

CodeLLDB needs to be enabled by specifying type: “lldb” in your launch.json configuration. Please also note, that prelaunchtask at the bottom is set to use task specified in tasks.json below, which will compile the code with debug information included.

The whole section looks like this:

https://gist.github.com/martinkunc/4aeddabb327f5677890524313ea4ea01

Next, before running, we are calling compilation every time. It is going to use clang++ and specify -g or — debug to generate source debug informations during build. I have also enabled C++17 and using libc++ as C++ standard library.

https://gist.github.com/martinkunc/b6b3491335b040db6293404b930ff838

And finally, I am setting up include folders and library folders, which is in c_cpp_properties.json:

https://gist.github.com/martinkunc/2bc9437e2be34f281813dfeec4637c86

And now it should work just fine, F5 should bring a debug session and stop on a breakpoint, like on the following screenshot.

How to Import a GPX track to Garmin 920XT

I recently bought a Forerunner 920 and despite trying before my first cycling, I was unable to import a GPX file, which I created from a map, to navigate me on the road.

Now, several days later, I returned to the topic and I was hoping that I would get rid of my dependency on Phone because of map navigation. After another round of searching, I was much more successfull this time.

Thanks to Cyberbob99, here on Garmin Forums I found the way. The trick is that you have to have ..

gpsies.com to the rescue

Fortunatelly, there is a site www.gpsies.com, which can convert from a file, which misses route (connection among points), timing data, altitude, or otherwise not-complete Gpx file obtained by real excercise. Go there, register and by clicking Create/Upload load your Gpx data.

Then continue with just clicking download in the left-bottom side. You will get another Gpx file, this time it will be bigger, because it contains track and some made excercise.

www.gpsies.com before clicking download

Garmin Connect imports Gpx

With the newly obtained fully featured Gpx file, including some generated “cycling”, I am successfully able to import it to my online (modern) Garmin connect. I just need to add it as activity first, because courses do not have import.

In the Graphical menu, I choose Activity and Import (Gpx).

Importing new Activity, like if you exercised in real


The import should succeed and I got a new activity, happened sometimes in 2010 (I can remove it later).

Then I can go to the activity itself (should contain the map too) and I can click to small wheel in top-right. This expands a menu which has option to Save as Course.


We have a Course now

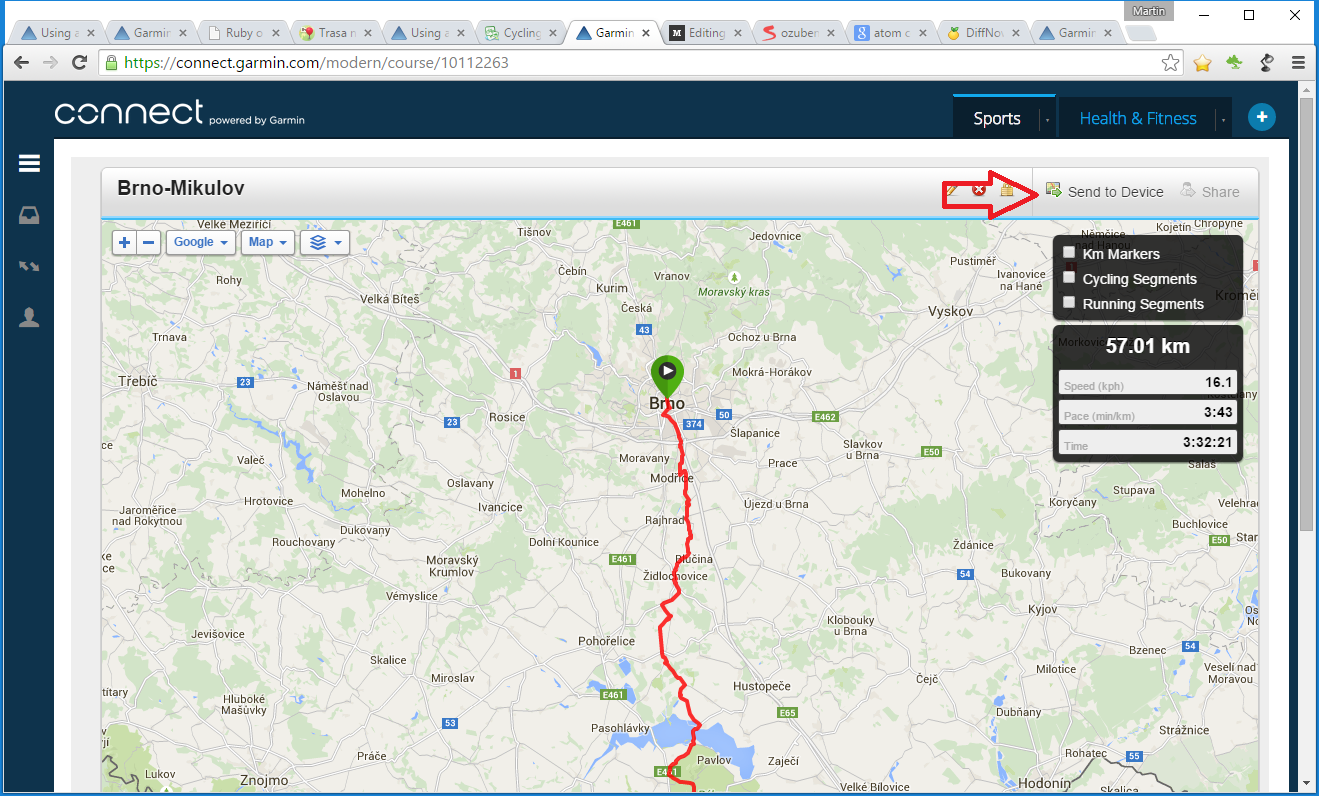
Now we can switch in Garmin connect to Courses, select the new one, we just created and when we go to its details, it should have option to Send to device. Click that option.

Sending course to the device

Now, it will ask you to Connect your device (I used Garmin Express, which needs to be installed on your Computer).

The rest is work of Garmin Express, Because I used Garmin Express, It asked me to connect device to Usb cradle, while page was searching for device, I set my device for sync and it was synchronised. I just returned to web and closed (still waiting) window on the site.

Then I went to my Garmin > Pressed three-dot button and went to Navigation > Tracks and the new map was there.


HTML 5 routing with Angular Cli on Ng server

If you are using Html 5 routing with old browsers (IE 11), probably you need special server side configuration (I am using this on IIS), . This article shows how to setup developer server routing in Angular Cli.

Using Angular Proxy to Backend

The Angular4 Cli is running on webpack dev server. Anyway Angular Cli natively supports only Proxy to backend configuration. It allows to setup which url pattern is being redirected internally by webserver. The configuration also allows to (redirect for example to localhost) and rewrite according to regex rules (provided by http=proxy=middleware module. The ng server needs configuration file, for example proxy.config.json and start ng serve with special parameter –proxy-config  to load configuration file.

The proxy.config.json file can look like this:

{
  "/": {
    "pathRewrite": {"^/(.+)": "/"},
    "target": "http://localhost:4200",
    "secure": false,
    "logLevel": "debug"
   }
}

The first line (with “/”) is asking to redirect all requests according to configuration in block.

The pathRewrite is doing to actual work. It changes url, which starts with / followed by some characters. The even better version could exclude strings with . (dot) like icon.gif from redirection, but this works well. Whatever is in form of slash and characters will be send to root “/” on server.

The target is the remote server, where your request is being proxied. It turns out this is required option. The original intent is to allow resending for example /api to another server. For our use we can use same server which ng server is hosting. In this case localhost.

To start ng server, with the config file use following argument:

ng serve --host localhost --proxy-config proxy.config.json --env dev --open

Common issues

If proxy doesnt work, verbose dev logging can be used to show redirections. Also, at the start lf ng serve, you should see two lines like:
[HPM] Proxy created: / -> http://localhost
[HPM] Proxy rewrite rule created: "^/(.+)" ~> "/"

Hopefully it helps.